



Traditional on-premise data warehouses simply can’t compare to the scalability and cost-effectiveness of Snowflake. Connecting dbt to Snowflake allows you to manage and run transformations directly in your data warehouse, taking your analytics pipelines to the next level of organization and reliability.
Read on to learn exactly how to connect dbt to your Snowflake data warehouse, authenticating your connection, and optimizing your Snowflake environment.
What is Snowflake?
Let’s start with the basics. What, exactly, is Snowflake?
Snowflake is a cloud data warehouse solution. It uses the infrastructure of major cloud providers including AWS, GCP, or Azure to deliver scalable, customizable performance. It’s consistent with the ANSI standard and includes your standard Analytics abilities.
Snowflake Key Features
Snowflake’s stand-out features include:
- Secure data sharing: Quickly, securely, and seamlessly share data between accounts in the same region with UDFs, views, and tables.
- Semi-structured data support: Natively load and query semi-structured data like XML and JSON using Snowflake’s VARIANT data type.
- Elastic scaling: Instantly scale compute resources up or down to match workload demands without downtime.
What is dbt?
dbt stands for “Data Build Tool” and is an open-source transformation framework. It focuses on transforming data in your warehouse of choice, letting you define SQL-based models that run directly where your data lives. You can use it to build models, tests, and documentation that keep your data pipelines reliable and analytics-ready.
dbt has two offerings:
- dbt Cloud: A Saas based solution that uses an Integrated Development Environment in the web.
- dbt CLI: Command line interface that uses a terminal.
dbt is an essential tool for anyone working with a data warehouse, including data engineers, analysts, and scientists.
dbt Key Features
dbt’s key features make it easy to transform and manage data in your data warehouse of choice (in this case, Snowflake):
- dbt Cloud data refreshes: Allows you to schedule transformation runs automatically.
- Documentation: dbt lets you generate detailed documentation for your models, tests, and sources, keeping your data pipeline structure clear and transparent.
- Prebuilt testing: Includes prebuilt tests for non-nullity, referential integration, accepted value, and uniqueness.
- Open-source and easy use: dbt is open to whoever wants to use it, and its readily available documentation makes it easier to learn.
Why Connect dbt to Snowflake?
So, how to connect dbt to Snowflake?
There are a few notable ways this connection can make managing transformations much easier and more reliable.
How? Well, dbt lets you define and run SQL-based transformations directly in your data warehouse. By connecting dbt to Snowflake (or any supported warehouse), you can:
- Convert tables to views or materializations in a consistent, centralized way.
- Organize transformation logic with models, tags, and macros.
- Integrate with GitHub for version control and collaboration.
How to Connect dbt to Snowflake
You see the benefits of connecting dbt to Snowflake now – but how hard exactly is it to connect the two tools?
Good news here: it’s relatively easy. Read on to learn.
Step One: Create Your Snowflake and dbt Account
Your first step is simple: create accounts for both Snowflake and dbt if you haven’t already. Set up your Snowflake account first, then your dbt account.
Step Two: Start a New Project in Your dbt Account
Once you’ve gotten both accounts set up, follow the steps in your newly made dbt account to create a new project.
To get started, select start. Then pick the most applicable dbt project name on the next page. You can then select Snowflake from the list of data warehouses on the following screen.
Step Three: Configure the dbt Snowflake Connection
You’re in the home stretch now. You’ll need to configure your connection by providing information on your:
- Account
- Role (this field is optional)
- Database
- Warehouse
For your account, you’ll want to use your account name. Say your Snowflake account URL is xyz10987.west-us-1.azure.snowflakecomputing.com. That means your Account Name is xyz10987.west-us-1.azure.
Your role should be your system role in Snowflake.
Your database requires you to build a connection to Logical Databases in the Data Warehouse if you want to run any queries.
Your data warehouse will also be used to run your queries.
You’ll configure these authentication details in your dbt Cloud project settings under Connection Details after completing the initial step.
Step Four: Connect dbt to Your GitHub Repository
You’re almost done with your setup. Now you’ll just want to connect dbt to your GitHub repository. Connecting to your GitHub means you get version control, collaboration, and automated deployments for your dbt project.
Do this by:
- Create a new GitHub repository using the same email address for your dbt Cloud account
- On the setup repository screen, select GitHub.
- Navigate to the integrations page in your dbt Cloud account.
- Select only the selected repositories and your newly made dbt repository.
- Click install.
- You’ll be taken to the Integrations page.
- Navigate to the hamburger menu in the top left navigation and select the home page.
Now whenever you return to GitHub, your repository link will be highlighted and easy to find.
Step Five: Authenticate Your dbt Snowflake Connection
Okay, your setup is nearly live. All that’s left is to authenticate it. There are a lot of different tactics you can take:
| Method | Best For | Pros | Caveats |
| Username + Password + MFA | Interactive work (developers, analysts) | Simple to set up; with MFA adds decent security; supports passkeys (biometric or hardware-backed) for stronger protection. | Not suitable for non-interactive automation (CI/CD etc.), since MFA prompts interrupt workflows. Snowflake is phasing out password-only logins. |
| Key Pair Authentication | CI/CD / automated workflows / service accounts | No passwords stored; works non-interactively; supports encryption & key rotation; more secure for programmatic access. | Need infrastructure for managing keys safely (vault, rotation); setup is more involved. |
| OAuth / SSO (Snowflake OAuth) | Enterprise environments; interactive developer use; where organization uses identity providers (Okta, Azure AD, etc.) | Avoids handling passwords; leverages SSO security policies (MFA, conditional access, etc.). | Usually not used for fully automated processes; usually “interactive” flow required at least once; some features may be enterprise-tier only. |
| Personal Access Tokens (PATs) | Scripts, legacy tools, or contexts where OAuth or Key Pairs can’t be used; short-lived programmatic access. | Easier than managing keys sometimes; can be revoked/expire; scoped to specific user roles/policies. | Must manage token rotation & secure storage; possible risks if leaked; not ideal long-term for heavy automation at scale. |
Upcoming Enforcement / Snowflake Changes
- Snowflake is deprecating single-factor password authentication. By November 2025, password-only logins will be blocked.
- All human users who use passwords are going to be required to use MFA.
- Service users (non-interactive) are being required to migrate off password authentication toward stronger methods (key pairs, PATs, etc.).
Practical Tips / Best Practices
- Classify users properly: distinguish between “human users” vs “service users” (or legacy service user type) so policies can be applied appropriately.
- Use authentication policies & network policies to enforce how users can connect (by client type, allowed methods, etc.).
- Cache MFA tokens (where possible) to reduce friction in interactive flows.
- Rotate credentials (keys, tokens) regularly. Store secrets in secure vaults. Limit scope/privileges for service accounts or automation.
- Monitor which users are still using weak or legacy authentication paths (e.g. single-factor passwords) and plan migration. There are built-in tools / scanners to help with this.
Optimizing Your New and Improved Snowflake Tech Stack
Now you have Snowflake and dbt connected, what’s next?
One of the biggest drawbacks of Snowflake – especially with your dbt connection – is not knowing how bills pile up. Snowflake charges you based on usage, but that line gets blurry when you can’t tell how often queries are running and what the best warehouse size is.
There’s an easy way to keep tabs – and automated optimizations – for everything: third-party Snowflake optimization tools.
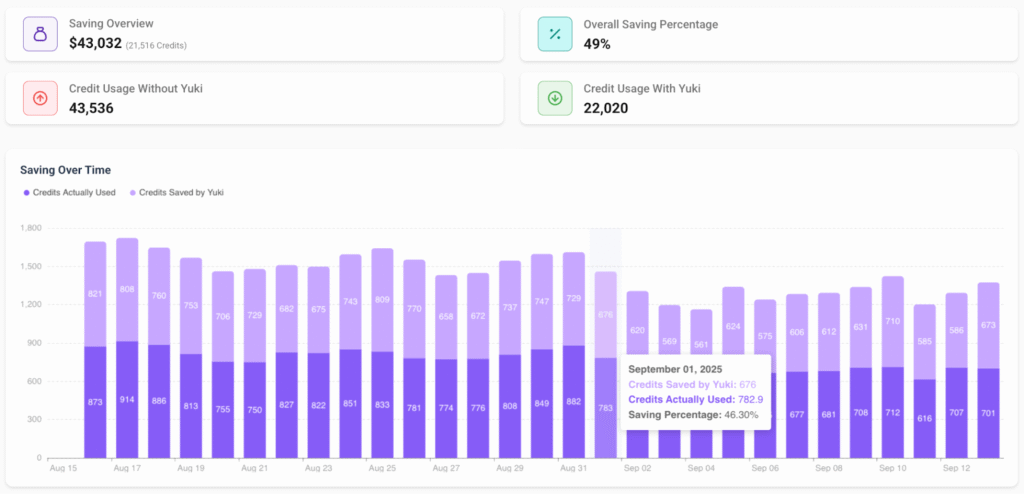
Tools like Yuki are designed as the plug-and-play, dev-free solution you need to keep your Snowflake costs from getting out of hand while maintaining optimal performance. Our customers have saved up to 30% after starting.
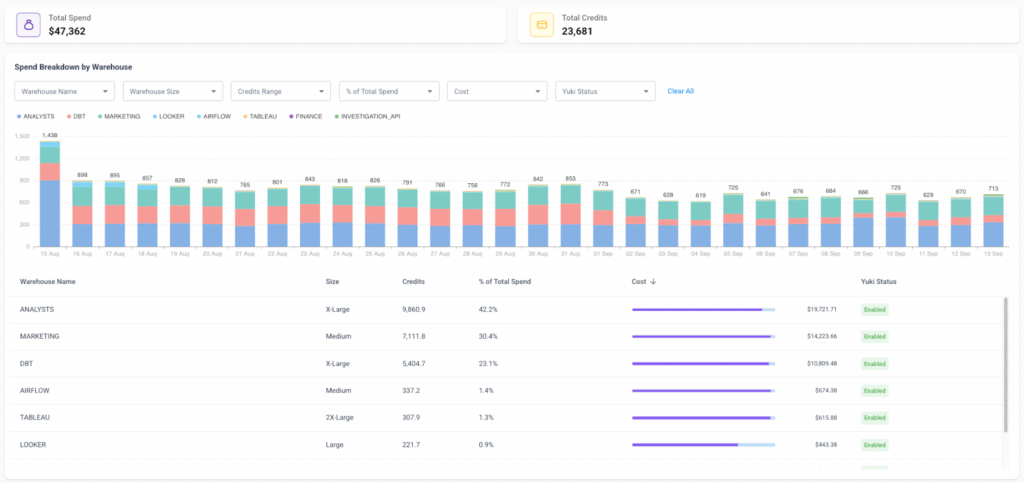
Curious to see how much you can save? Reach out now for your free demo.