



Data partitioning should be your go-to move when it comes to warehouse optimization.
It’s a technique that lets you separate large datasets into smaller, easier to manage, chunks – which is a big boost to query performance, which can also reduce your warehouse’s cost.
Where do Snowflake micro-partitions come into play with this?
Snowflake micro-partitions, unlike your traditional RDBMSs, take your typical data partitions and break them into even smaller bites. This means you can get even faster query runtimes and don’t need to worry about managing massive data chunks.
This guide will walk you through everything you need to know about Snowflake micro-partitioning, including:
- What exactly data partitioning is
- What Snowflake micro-partitioning is
- How Snowflake micro-partitioning works
- Why you should be using micro-partitioning
- How to push your micro-partitioning performance to the next level
What is Data Partitioning?
Let’s start from the beginning here. Data partitioning is the process of sorting a data table into smaller, more manageable parts.
Say you’re looking at the customer locations for your FinOps organization. You might want to partition that data based on region. You could also sort if based on the date customers joined your organization.
In many databases a partition can be addressed like a sub-table, but in Snowflake micro-partitions are internal and are not queried directly, you always query the table and the optimizer decides which micro-partitions to scan.
You can actually use a data partitioning technique called partition pruning to improve query performance. This looks like you are eliminating any unnecessary partitions based on your query criteria, earning you back valuable time and resources.
What are Snowflake Micro-Partitions?
Snowflake micro-partitions are Snowflake’s automatic contiguous units of data storage. Whenever you load data into a Snowflake table, it will actually automatically divide that data into a micro-partition between 50 to 500MB of uncompressed data.
Your traditional warehouse will usually have a limited number of partitions, but Snowflake micro-partitions mean you can get a lot more granular, cutting large tables into millions – or even hundreds of millions – micro-partitions.
Snowflake will store a metadata file for each micro-partition’s, including information such as:
- What the range of values for each micro-partition column is
- Any additional query optimization properties
- How many distinct values there are
Micro-Partition Metadata: The Secret Sauce
Each micro-partition stores crucial data that makes query optimization possible:
- Min/Max values: The smallest and largest value in each column, allowing Snowflake to skip entire micro-partitions when values fall outside query ranges
- Distinct value counts: Helps the query optimizer choose the most efficient execution plan.
- Null value counts: Enables optimization for queries filtering on NULL or NOT NULL conditions.
This metadata is what makes micro-partition pruning so effective – Snowflake can eliminate irrelevant micro-partitions before even reading the data.
Example of How Snowflake Micro-Partitions Work
Let’s take a real-life example of what these micro-partitions look like in real life.
Here’s an example from Snowflake, showing four columns sorted by date:
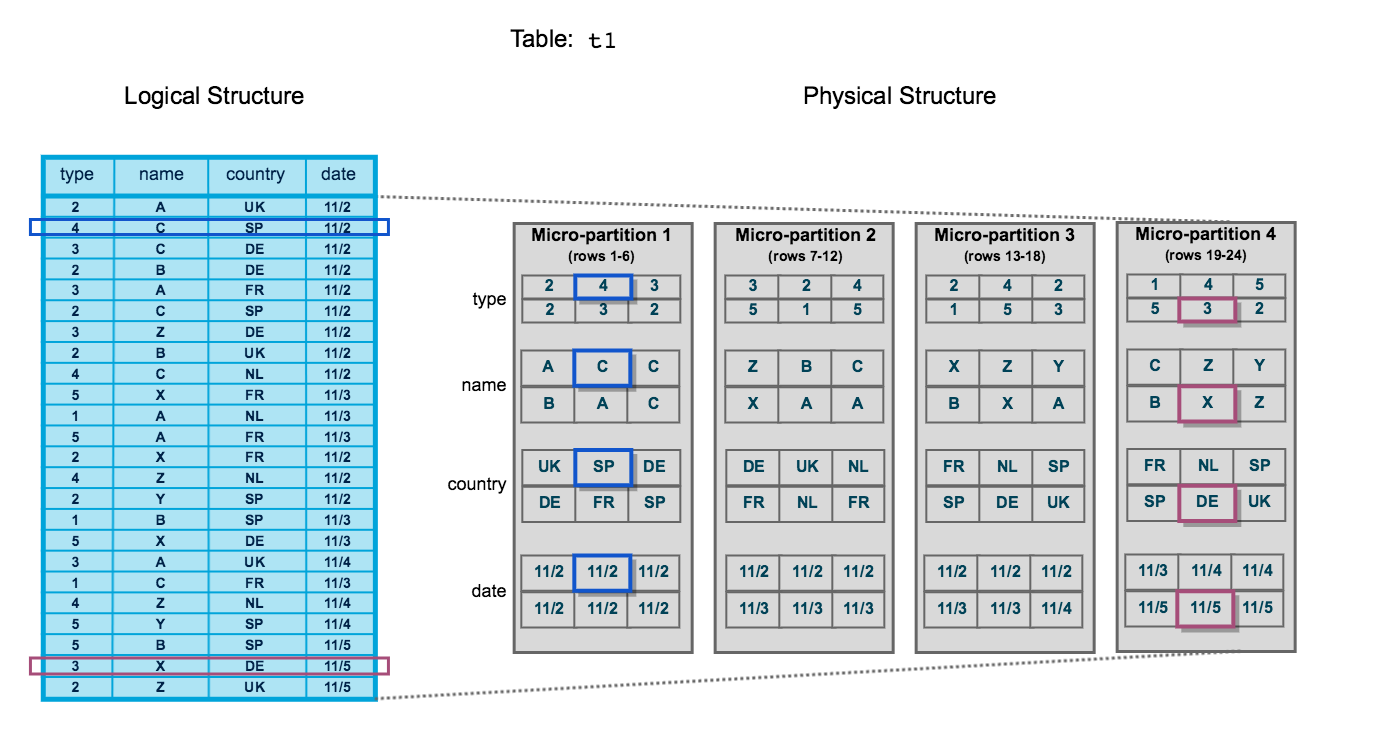
The table has 24 rows stored across 4 micro-partitions. Each row is equally divided between each micro-partition, with four separate micro-partitions each containing six rows of data.
Data is sorted and stored by column, not by row, within each micro-partition. This specific formatting enables Snowflake to:
- Prune micro-partitions not needed for a specific query
- Prune by columns within the remaining micro-partitions
Note: This example is small. Your typical table might contain thousands – or millions – of micro-partitions.
Why Use Snowflake Micro-Partitions
Micro-partitions in Snowflake are a great tool to get:
- Better query performance
- Automated data optimization
- Increased scalability and concurrency
Better Query Performance
Micro-partitions mean Snowflake can retrieve data faster and more efficiently because it can skip unnecessary partitions – in other words, micro-partition pruning.
Think of this way: if you’re looking for a piece of paper in a filing cabinet, you’re likely to find that paper much faster if it’s stored in a stack of labeled folders as opposed to if you have to dig through a pile of loose papers.
Automated Data Optimization
Snowflake always automatically applies data compression and optimization techniques to any micro-partition using a hybrid columnar storage format. This means data is stored column-by-column within each micro-partition, which makes for much faster query processing and much more efficient compression.
Think of it like organizing a library: instead of storing books randomly, you group similar books together (compression) and create detailed catalogs (metadata) so you can quickly find exactly what you need without scanning every shelf.
Increased Scalability and Concurrency
Using micro-partitions correctly can actually get you much better scalability and concurrency because Snowflake is able to work on queries in parallel. This happens because when multiple users run queries simultaneously, Snowflake can work on different micro-partitions at the same time, distributing the workload across available compute resources.
This parallel process means far faster query execution times and better resource utilization. This is especially the case for large tables where different queries can target different micro-partitions without interfering with each other.
How to Optimize Micro-Partitions
Snowflake is the one to make the big decisions when it comes to micro-partitions – and sometimes it doesn’t make the best choice for optimization and performance for your tech stack.
Keep these different steps in mind if you’re looking to improve your setup.
Step 1: Choose the Correct Key
Data is initially written in load order, then a clustering key tells Snowflake’s automatic reclustering service how to re-organize existing micro-partitions over time.
For example, say you’re looking at a sales table frequently queried by date. By setting the clustering key to the date column, you’re ensuring related dates are stored together. That means a query for “last month’s sales” might only need to scan 30 micro-partitions instead of 1,000.
Keep these things in mind when building out your clustering keys:
- Use columns frequently in WHERE clauses
- Prefer columns with high cardinality (many distinct values)
- Avoid columns that change frequently
- Clustering increases credit spend during reclustering. Monitor the system view `SNOWFLAKE.ACCOUNT_USAGE.CLUSTERING_HISTORY.
- Consider composite keys for more complex query patterns
Step 2: Maintain an Optimal Size
End-users cannot set micro-partition size directly. Snowflake keeps each one between 50 MB and 500 MB (uncompressed). What you can influence is how evenly data is distributed by loading in balanced batches and by adding an appropriate clustering key.
Snowflake will try to maintain the optimal micro-partition size based on your data’s volume and characteristics, but the best way to keep your platform well-optimized is to keep an eye on this yourself, or invest in a third-party optimization tool.
Step 3: Invest in a Third-Party Optimization Tool
Manual optimization of micro-partitions requires constant monitoring of query patterns, clustering effectiveness, and partition pruning statistics. For most teams, this is a huge time investment and nearly impossible to upkeep.
Automated optimization tools handle this by monitoring and adjusting automatically, maintaining that optimal micro-partition performance without manual intervention. Solutions like Yuki provide this hands-off optimization while reducing monthly costs up to 30%.
Curious how much Yuki can help you save? Reach out now for your free demo.